Intel RealSense
硬件
- 对比: https://www.youtube.com/watch?v=2pLCcNeoXsU
- D405:Stereo,70mm~0.5m,Global Shutter,双目视觉生成深度图,适合近距离物体
- D415:Active IR Stereo,0.5m~3m,Rolling Shutter,因此不太适合需要高帧率的场景
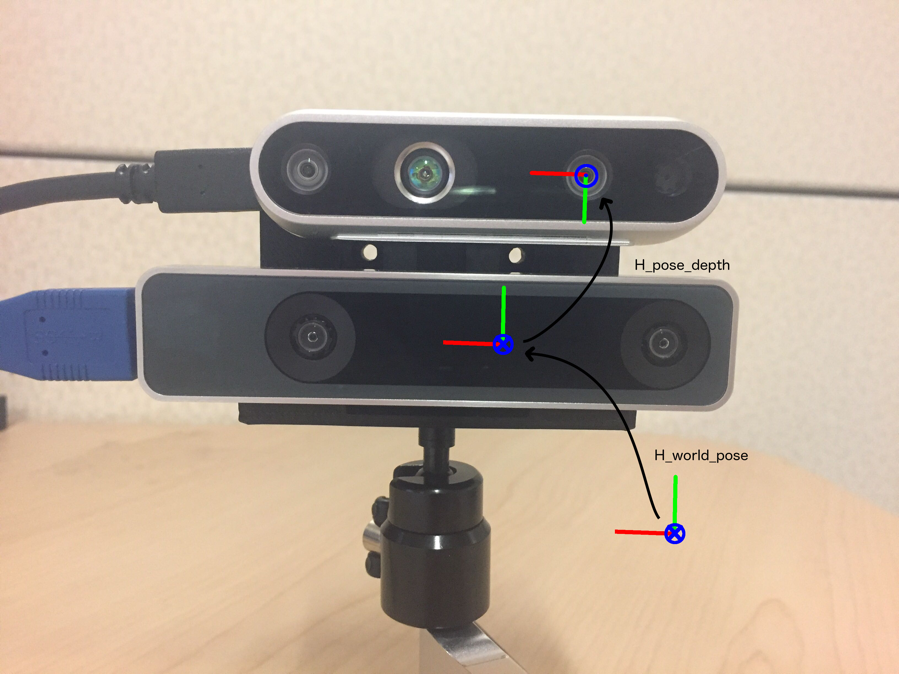
camera_link、camera_depth_frame间无位移、无旋转变换。camera_depth_frame、camera_depth_optical_frame间无位移,有旋转变换。camera_link、camera_color_frame间修正位移(主要为y方向上15mm左右),旋转微调camera_color_frame、camera_color_optical_frame间无位移,有旋转变换
- D435:Active IR Stereo,0.3m~3m,Global Shutter
 (出处:Intel® RealSense™ Tracking Camera T265 and Intel® RealSense™ Depth Camera D435 - Tracking and Depth)
 - D455:Active IR Stereo,0.6m~6m,Global Shutter,要求深度大于0.6m,不适合精细的抓取任务
驱动准备工作
安装librealsense
$ sudo apt-key adv --keyserver keyserver.ubuntu.com --recv-key F6E65AC044F831AC80A06380C8B3A55A6F3EFCDE || sudo apt-key adv --keyserver hkp://keyserver.ubuntu.com:80 --recv-key F6E65AC044F831AC80A06380C8B3A55A6F3EFCDE
$ sudo add-apt-repository "deb https://librealsense.intel.com/Debian/apt-repo $(lsb_release -cs) main" -u
$ sudo apt-get install librealsense2-dkms
$ sudo apt-get install librealsense2-utils- 安装建议关掉UEFI secure boot
- 可选
$ sudo apt-get install librealsense2-dev
$ sudo apt-get install librealsense2-dbg- 安装旧版ROS Wrapper for Intel® RealSense™ Devices
ROS2新版ROS Wrapper for Intel® RealSense Devices?
$ sudo apt-get install ros-$ROS_DISTRO-realsense2-camera - 使用Realsense Viewer:
realsense-viewer - 测试:
roslaunch realsense2_camera rs_camera.launch filters:=pointcloud- 在
Global Options->Fixed Frame里选择camera_depth_frame - 在
topic中添加PointCloud2(路径为/camera/depth/color/points)
D405的非官方ROS支持
- 官方wrapper仅支持使用ROS 2
The new D405 model is only supported by the 4.x ROS2 wrapper series on the ros2_beta branch. There are no plans to add support for D405 to the 2.x ROS1 wrapper or the previous 3.x ROS2 wrapper as the focus of the RealSense ROS wrapper’s developer team is now on the 4.x ROS2 wrapper series.
- 非官方支持:https://github.com/rjwb1/realsense-ros (未测试)
移除全部librealsense安装包
- 命令为
dpkg -l | grep "realsense" | cut -d " " -f 3 | xargs sudo dpkg --purge
pyrealsense2
概述
pyrealsenseAKApyrealsense/2.0is a community supported Python wrapper for the legacy librealsense v1.12.1. This wrapper does not support newer versions and does not work with the RealSense SDK 2.0.HOWEVER: The
pyrealsense2package is our official wrapper which does support SDK 2.0
- 安装:
pip install pyrealsense2
使用
连接了单个RS设备,不使用设备序列号
列出所有设备
- 代码
import pyrealsense2 as rs

context = rs.context()
if len(context.devices) > 0:
	for d in context.devices:
		print("Found devices:", d.get_info(rs.camera_info.name), " ", d.get_info(rs.camera_info.serial_number))
else:
	print("No RS devices found")
初始化
- 代码
import pyrealsense2 as rs

pipeline = rs.pipeline()
config = rs.config()
pipeline_wrapper = rs.pipeline_wrapper(pipeline)
pipeline_profile = config.resolve(pipeline_wrapper)
device = pipeline_profile.get_device()- 注意初始化步骤和取图像/深度信息之间需要添加一个延迟(如
rospy.sleep(1))!,否则可能出现取回的信息为空
获取设备信息
- 在上面的代码完成初始化后
device_product_line = str(device.get_info(rs.camera_info.product_line))
print(device_product_line)
for s in device.sensors:
    print(s.get_info(rs.camera_info.name))
    print(s.get_info(rs.camera_info.serial_number))
- D405支持的输出格式(在上面的代码完成初始化后)
- 彩色图像1280x720@30, 15, 5,848x480@90, 60, 30, 15, 5,640x480@90, 60, 30, 15, 5等
- 深度图像1280x720@30, 15, 5,848x480@90, 60, 30, 15, 5,640x480@90, 60, 30, 15, 5等
for s in device.sensors:
    pf = s.get_stream_profiles()
    for p in pf:
        print(p)
使用预设的配置
- 在上面的代码完成初始化后
depth_sensor = device.first_depth_sensor()
preset_range = depth_sensor.get_option_range(rs.option.visual_preset)
for i in range(int(preset_range.max)):
    visual_preset = depth_sensor.get_option_value_description(rs.option.visual_preset, i)
    print("{}: {}".format(i, visual_preset))
    if visual_preset == "High Accuracy":
        depth_sensor.set_option(rs.option.visual_preset, i)
相机参数(内参,畸变,比例)
- 通过API获取相机内参
import pyrealsense2 as rs
pipeline = rs.pipeline()
config = rs.config()

config.enable_stream(rs.stream.depth, 1280, 720, rs.format.z16, 30)
profile = pipeline.start(config)

st_profile = profile.get_stream(rs.stream.depth)
intr = st_profile.as_video_stream_profile().get_intrinsics()
print(intr)

pipeline.stop()- 数据解析(D415为例)
- 数据类型为
pyrealsense2.pyrealsense2.intrinsics - 数据示例
[ 1280x720 p[635.698 351.514] f[898.194 898.194] Brown Conrady [0 0 0 0 0] ]数据依次为分辨率、ppx和ppy,f,和畸变模型 - 提取具体参数的方法为
intr.height,intr.width,intr.ppx,intr.ppy,intr.fx,intr.fy,intr.model,intr.coeffs与sensor_msgs/CameraInfo的对应关系为:p[]和f[ ] - 畸变为全0,参考
Yes, these are supposed to be zero for the D400. We consider adding coefficient estimation to the RGB calibration to reduce the distortion (by about 1 pixel at extremes), but at the moment projection without coefficients is the most accurate you can do (we are not calibrating and then ignoring the coefficients, we estimate fx, fy, ppx and ppy without them)
- 数据类型为
- z轴比例(如D415的scale数量级为0.001)
depth_sensor = profile.get_device().first_depth_sensor()
depth_scale = depth_sensor.get_depth_scale()
print(depth_scale)
同时使用多个RS(使用设备序列号调用)
- 代码示例
class rs_get():
    ## self.color_image: a (width, height, 3) matrix, for RGB data
    ## self.depth_data:  a (wioth, height, 3) matrix, for depth data (robot's world frame)

    def __init__(self, serial, alias="", width = 1280, height = 720):
        '''
        serial: The serial NO. of the RealSense
        alias: name your camera topic
        The default width and height are set to  1280x720
        '''

        if alias=="":
            self.alias = "/rs_" + str(serial)
        else:
            self.alias = alias

        self.height = height
        self.width = width

        self.image_pub = rospy.Publisher(self.alias+"/color/raw", Image, queue_size = 10)
        self.debug_pub = rospy.Publisher(self.alias+"/debug", Image, queue_size = 10)
        self.bridge = CvBridge()

        self.pipeline = rs.pipeline()
        self.config = rs.config()
        self.config.enable_device(str(serial))
        self.config.enable_stream(rs.stream.depth, width, height, rs.format.z16, 30)
        self.config.enable_stream(rs.stream.color, width, height, rs.format.bgr8, 30)
        self.profile = self.pipeline.start(self.config)
        self.depth_sensor = self.profile.get_device().first_depth_sensor()
        self.depth_scale = self.depth_sensor.get_depth_scale()
        # ## use preset configuration
        # preset_range = self.depth_sensor.get_option_range(rs.option.visual_preset)
        # for i in range(int(preset_range.max)):
        #     visual_preset = self.depth_sensor.get_option_value_description(rs.option.visual_preset, i)
        #     if visual_preset == "High Accuracy":
        #         self.depth_sensor.set_option(rs.option.visual_preset, i)
        # self.set_config("High Accuracy")

        print("Depth Scale is: " , self.depth_scale)

        self.k = [0.0]*9 # camera's intrinsic parameters
        self.distort = [0.0]*5
        self.get_cam_param()
        print(self.k)
        self.is_data_updated = False

        ## homogeneous transformation matrix from the camera (obj) to the world (ref)
        self.ht = np.zeros([4,4])

        self.pc2_pub = rospy.Publisher(self.alias+"/pc2", PointCloud2, queue_size=10)

        ## wait for 1s to maker sure color images arrive
        rospy.sleep(1)

    def set_config(self, config):
        ## config = "Default", "High Accuracy", "High Density"
        if config not in ["Default", "High Accuracy", "High Density"]:
            config = "Default"
        ## use preset configuration
        preset_range = self.depth_sensor.get_option_range(rs.option.visual_preset)
        for i in range(int(preset_range.max)):
            visual_preset = self.depth_sensor.get_option_value_description(rs.option.visual_preset, i)
            if visual_preset == config:
                self.depth_sensor.set_option(rs.option.visual_preset, i)

        data_retrieve = -1
        while data_retrieve == -1:
            print("waiting for data...")
            data_retrieve = self.get_rgbd()

    def get_cam_param(self):
        st_profile = self.profile.get_stream(rs.stream.depth)
        self.intr = st_profile.as_video_stream_profile().get_intrinsics()
        self.k[0] = self.intr.fx
        self.k[2] = self.intr.ppx
        self.k[4] = self.intr.fy
        self.k[5] = self.intr.ppy
        self.k[8] = 1.0

        for i in range(5):
            self.distort[i] = self.intr.coeffs[i]

    def get_rgbd(self):
        # Create an align object
        # rs.align allows us to perform alignment of depth frames to others frames
        # The "align_to" is the stream type to which we plan to align depth frames.
        align_to = rs.stream.color
        align = rs.align(align_to)

        try:
            # Get frameset of color and depth
            frames = self.pipeline.wait_for_frames()

            # Align the depth frame to color frame
            aligned_frames = align.process(frames)

            # Get aligned frames
            aligned_depth_frame = aligned_frames.get_depth_frame() # aligned_depth_frame is a 640x480 depth image
            color_frame = aligned_frames.get_color_frame()

            # Validate that both frames are valid
            if not aligned_depth_frame or not color_frame:
                return -1

            depth_image = np.asanyarray(aligned_depth_frame.get_data())
            color_image = np.asanyarray(color_frame.get_data())

            #depth image is 1 channel, color is 3 channels
            depth_image_3d = np.dstack((depth_image,depth_image,depth_image))
            # Render images:
            #   depth align to color on left
            #   depth on right
            depth_colormap = cv2.applyColorMap(cv2.convertScaleAbs(depth_image, alpha=0.03), cv2.COLORMAP_JET)
            # self.image = np.hstack((bg_removed, depth_colormap))
            self.color_img = color_image
            self.depth_1d = depth_image
            self.depth_img = depth_colormap
            return 1

        except:
            return -1

    def depth_1d_to_3d(self):
        ## depth_3d_cam is the position of points based on camera coordinate frame.
        _ = self.get_rgbd()
        self.depth_3d_cam = np.zeros([self.height, self.width, 3])
        for iy in range(self.height):
            for ix in range(self.width):
                z = self.depth_1d[iy, ix]
                pt_3d = rs.rs2_deproject_pixel_to_point(self.intr, [ix, iy], z)
                self.depth_3d_cam[iy,ix] = [i*self.depth_scale for i in pt_3d]
数据流
- 获取彩色图像数据及对齐后的深度
- 深度数据格式:大小为(height, width)的二维矩阵,每个元素为uint16,0和65535均表示异常值,如果直接比较可能会出现差值的数据溢出的错误
align_to = rs.stream.color
align = rs.align(align_to)
try:
    while True:
        # Get frameset of color and depth
        frames = self.pipeline.wait_for_frames()
        # frames.get_depth_frame() is a 640x360 depth image

        # Align the depth frame to color frame
        aligned_frames = align.process(frames)

        # Get aligned frames
        aligned_depth_frame = aligned_frames.get_depth_frame() # aligned_depth_frame is a 640x480 depth image
        color_frame = aligned_frames.get_color_frame()

        # Validate that both frames are valid
        if not aligned_depth_frame or not color_frame:
            continue

        #depth image is 1 channel (16U1), color is 3 channels (8U3)
        depth_image = np.asanyarray(aligned_depth_frame.get_data())
        color_image = np.asanyarray(color_frame.get_data())

        depth_image_3d = np.dstack((depth_image,depth_image,depth_image))

        # Render images:
        #   depth align to color on left
        #   depth on right, need applyColorMap to convert 16U3 image to bgr8 compatible
        depth_colormap = cv2.applyColorMap(cv2.convertScaleAbs(depth_image, alpha=0.03), cv2.COLORMAP_JET)
        # self.image = np.hstack((bg_removed, depth_colormap))
        color_img = color_image
        depth_1d = depth_image
        depth_img = depth_colormap

        break
except:
    ...
保存与读取深度文件
- 可以直接保存/读取
.npy文件
depth_image = np.load("depth.npy")- 读取RealSense Viewer的
.raw文件:
with open('d405_Depth.raw', 'rb') as f:
    img_data = f.read()
rows = 240
cols = 424
resolution = rows * cols
img = np.frombuffer(img_data, count=resolution, dtype=np.uint16)
img = img.reshape((rows, cols))- 分辨率可以从
d405_Depth_metadata.csv中获得
二维数据与三维数据的转换
- 常用函数
rs2_deproject_pixel_to_point()rs2_project_color_pixel_to_depth_pixel()rs2_project_point_to_pixel()
已知二维图像的像素和深度数据,求出该点的三维位置
方法一:调用API
- 官方参考资料:Projection in RealSense SDK 2.0
- 调用函数
rs2_deporject_pixel_to_point,传入参数为相机参数(类型pyrealsense2.pyrealsense2.intrinsics,参考获取后直接传入即可),[x,y]为其在图像中的像素位置,sensor.depth_1d[y,x]为对应的z值。返回的三维位置为浮点数, 获取后数据应乘以depth_scale以获得真实值。不同型号的RealSense的depth_scale可能不同 (假设已实例化一个sensor类)
pos = rs.rs2_deproject_pixel_to_point(sensor.intr, [x,y], sensor.depth_1d[y,x])- 将深度图转化为3D点云:
def depth_1d_to_3d(self):
    ## depth_3d_cam is the position of points based on camera coordinate frame.
    _ = self.get_rgbd()
    self.depth_3d_cam = np.zeros([self.height, self.width, 3])
    for iy in range(self.height):
        for ix in range(self.width):
            z = self.depth_1d[iy, ix]
            pt_3d = rs.rs2_deproject_pixel_to_point(self.intr, [ix, iy], z)
            self.depth_3d_cam[iy,ix] = [i*self.depth_scale for i in pt_3d]
方法二:手动转换
- k为
的相机内参矩阵(是否需要depth_scale未测试)
np_cloud = np.zeros((height*width,3))
for iy in range(height):
    for ix in range(width):
        idx = iy*width+ix
        z = data[iy, ix]*self.depth_scale
        if z!=0:
            ## same coordinate as `/camera/depth/image_rect_raw`
            ## y (left & right), z (up & down) are on the camera plane, x is the depth
            np_cloud[idx][0] = z
            np_cloud[idx][1] = -z*(ix-self.k[2])/self.k[0]
            np_cloud[idx][2] = -z*(iy-self.k[5])/self.k[4]

## example: convert to open3d point cloud
self.pcd.points = o3d.utility.Vector3dVector(np_cloud)
已知空间中的三维位置,查找在图像上对应的点
- 使用
rs2_project_point_to_pixel(intrin, point)函数- 输入为内参和三维空间中的点(单位为米)
st_profile = self.profile.get_stream(rs.stream.depth) self.intr = st_profile.as_video_stream_profile().get_intrinsics() - 输出为浮点数数组(根据需要转化为整型) 根据型号不同,函数将使用不同的畸变模型
Based on the design of each model of RealSense device, the different streams may be exposed via different distortion models.
- None
- An image has no distortion, as though produced by an idealized pinhole camera. This is typically the result of some hardware or software algorithm undistorting an image produced by a physical imager, but may simply indicate that the image was derived from some other image or images which were already undistorted. Images with no distortion have closed-form formulas for both projection and deprojection, and can be used with both
rs2_project_point_to_pixel(...)andrs2_deproject_pixel_to_point(...).
- Modified Brown-Conrady distortion
- An image is distorted, and has been calibrated according to a variation of the Brown-Conrady Distortion model. This model provides a closed-form formula to map from undistorted points to distorted points, while mapping in the other direction requires iteration or lookup tables. Therefore, images with Modified Brown-Conrady Distortion are being undistorted when calling
rs2_project_point_to_pixel(...). This model is used by the Intel RealSense D415’s color image stream.
- Inverse Brown-Conrady distortion
- An image is distorted, and has been calibrated according to the inverse of the Brown-Conrady Distortion model. This model provides a closed-form formula to map from distorted points to undistored points, while mapping in the other direction requires iteration or lookup tables. Therefore, images with Inverse Brown-Conrady Distortion are being undistorted when calling
rs2_deproject_pixel_to_point(...). This model is used by the RealSense SR300’s depth and infrared image streams.
- 输入为内参和三维空间中的点(单位为米)
构建一个独立的ROS package
- 理由:无需多线程编程,可以实现数据采集(通过rostopic发送)的同时保存(录像)
- 接口:图像数据和相机内参通过rostopic发送,理论上RealSense的内参为固定值,但是考虑到和其它可变焦相机(内参可变)的一致性,还是采用rostopic。录像的开始和终止通过rosservice实现
- 代码参考
- 对于调用这个package的应用,3D与2D之间的投射需要引入pyrealsense库,并重新构建相机内参。代码为:
self.intr = rs.pyrealsense2.intrinsics() ## construct a intrinsics for 3D <-> 2D projection
self.intr.fx = self.k[0]
self.intr.ppx = self.k[2]
self.intr.fy = self.k[4]
self.intr.ppy = self.k[5]
self.intr.coeffs = [0, 0, 0, 0, 0]
self.intr.width = self.width
self.intr.height = self.height
self.intr.model = rs.distortion.brown_conrady